Introduction
While a webhook is a message that an application automatically creates when a predefined event is triggered, a webhook subscription is a way for you to request that this automatically created message be sent to an endpoint that you provide. As this article progresses, you will see webhook subscriptions simplified even further, and then learn about the methods you can use to fine-tune webhook subscriptions created on Convoy such that consumer endpoints only receive messages that are ready for use.
Creating a webhook subscription is similar to enlisting to receive email notifications from a platform, an example is creating a job alert on LinkedIn. But note that the good thing about being able to create a webhook subscription is not simply the fact that your endpoints get to receive messages when events are triggered, but also the fact that you can configure the different settings of this subscription such that only messages that match these configurations get sent to your endpoints. This is much like how the best part about creating a job alert on LinkedIn is not that you receive job alerts but that the alerts are those that you actually have an interest in, otherwise, imagine if LinkedIn sent you an alert every time any job at all is posted, things will quickly start to look messy.
A webhook subscription would typically have a property used to define the event type that the subscribed endpoint should receive. In Convoy, this property and some other methods such as filtering by payload structure and Webhook Fan-out are used to nicely manage event routing in both incoming and outgoing webhook projects. Join me as we walk through how to put each one of these to use.
The Proper Way To Subscribe To Events
In this section, I will talk about Event Types, Payload Structure, Webhook Fan-out, and Retry Logic, and how to effectively use them together to create a webhook subscription that meets your requirements. We would demonstrate their use cases by creating sample webhook events, therefore to follow along, you would need the following:
- A Convoy cloud account or your self-hosted convoy.
- A backend to receive webhook events( I used webhook.site)
Event Types
In an outgoing webhook project Event Types are the first level of filter used in Convoy to determine which endpoint(s) to deliver an event to. They are set when creating a subscription for an endpoint, the property event_type takes an array of all the event types that you want this endpoint to receive notifications for. When no event type or subscription is created, convoy by default will subscribe an endpoint to all event types.
It’s a good idea to see this in action if you haven’t done this kind of thing in Convoy before. Let’s create a subscription and specify event types, then create two events: one that matches one of our event types and another that does not.
To begin, log in to your Convoy account and follow the prompts to create an Outgoing Webhooks project. If what you see after logging in is not the interface for creating a project, navigate to <your-base-url>/projects/, on Convoy cloud the URL would be https://dashboard.getconvoy.io/projects/. Provide a name for your project, select the project type “Outgoing webhooks” and hit the button for creating the project. Copy and store the API key that is shown next, as you cannot see it again. The page you see next is for creating an endpoint and optionally a subscription. In the gif below, you see me do the following:
- Name this new endpoint "outgoing-endpoint-one"
- Enter the URL which I have gotten from the webhook dump webhook.site as my receiving URL.
- Disable the Automatically subscribe endpoint to all events sent? toggle so that I can manually create a subscription.
- Name the new subscription ”outgoing-subscription-one”.
- Under Set Configurations, i selected Event Types and created two event types:
user.createdanduser.deleted. - Scroll down and clit the Save and Proceed button.
Complete the same steps from your end and you would have created a webhook subscription with Event Types ready to work with.
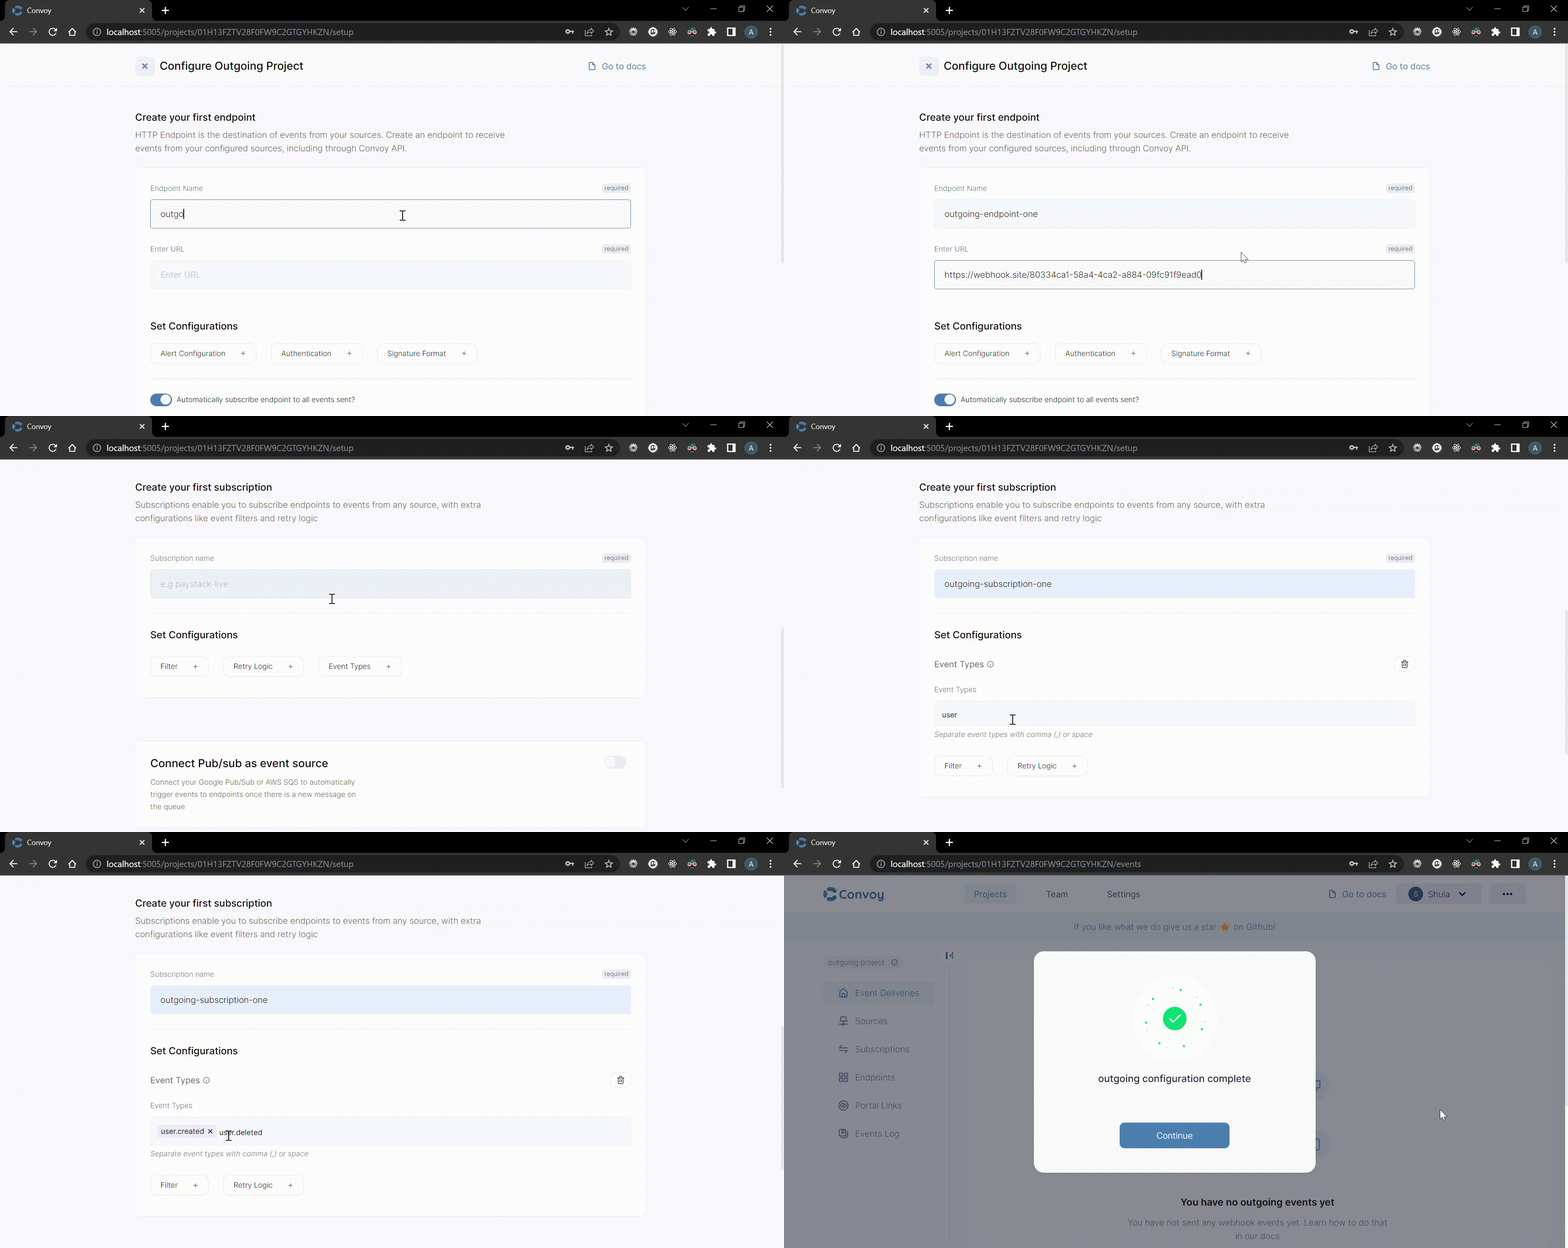
Your outgoing project is now ready to start sending webhook requests. We would trigger a request by creating an event via the Convoy endpoint https://dashboard.getconvoy.io/api/v1/projects/{projectID}/events on the terminal.
Construct the following request to make on your terminal replacing <host>, <your-project-id>, <project-api-key> and, <endpoint-id> with their actual values:
$ curl --request POST \
  --url <host>/api/v1/projects/<your-project-id>/events \
  --header 'Authorization: Bearer <project-api-key>' \
  --header 'Content-Type: application/json' \
  --data '{
    "endpoint_id": "<endpoint-id>",
    "event_type": "user.updated",
    "data": {
      "name": "Sam",
    }
}'
Note that you can find your project ID from settings on <your-base-url>/projects/, and your endpoint ID by navigating to endpoints from your dashboard.
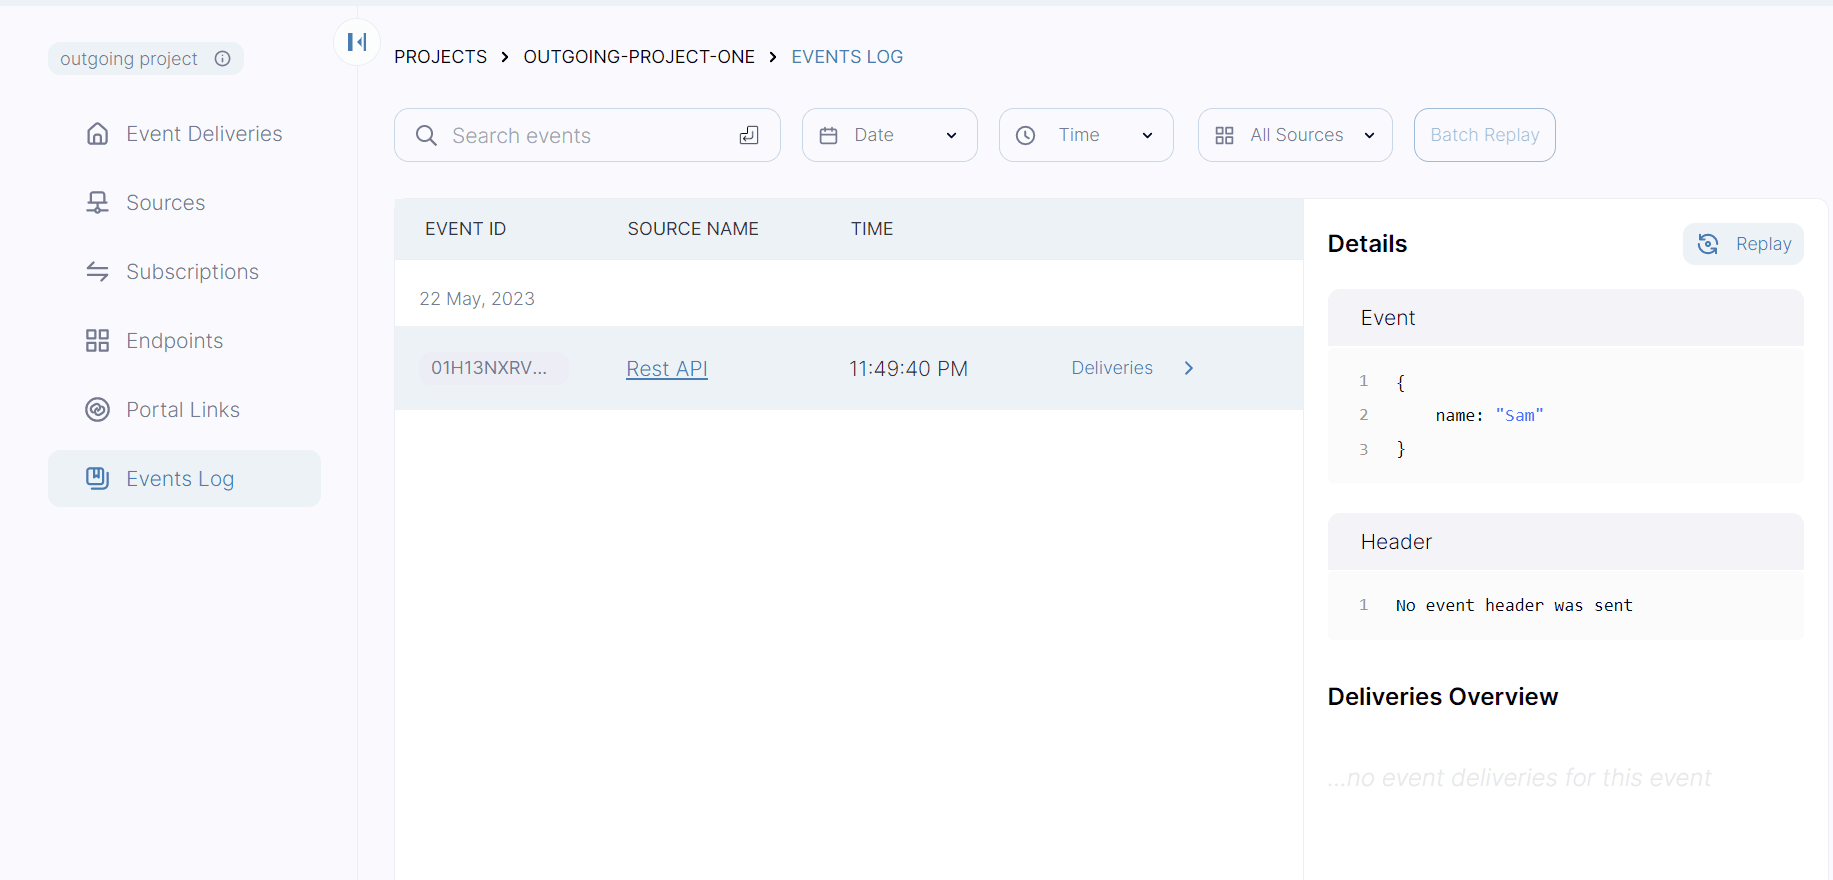
In the above request, the value of event_type is set to user.updated, but we have subscribed the endpoint we created earlier to receive notifications only for event types user.created & user.deleted. Therefore no event delivery is created since no endpoint has subscribed to this event type. Go to your dashboard under Event Deliveries and confirm that this event is not listed. However, you can see this event saved under "Event Logs".
Trigger a second request, this time changing the event type to user.created:
$ curl --request POST \
  --url <host>/api/v1/projects/<your-project-id>/events \
  --header 'Authorization: Bearer <project-api-key>' \
  --header 'Content-Type: application/json' \
  --data '{
    "endpoint_id": "<endpoint-id>",
    "event_type": "user.created",
    "data": {
      "name": "Sam",
    }
}'
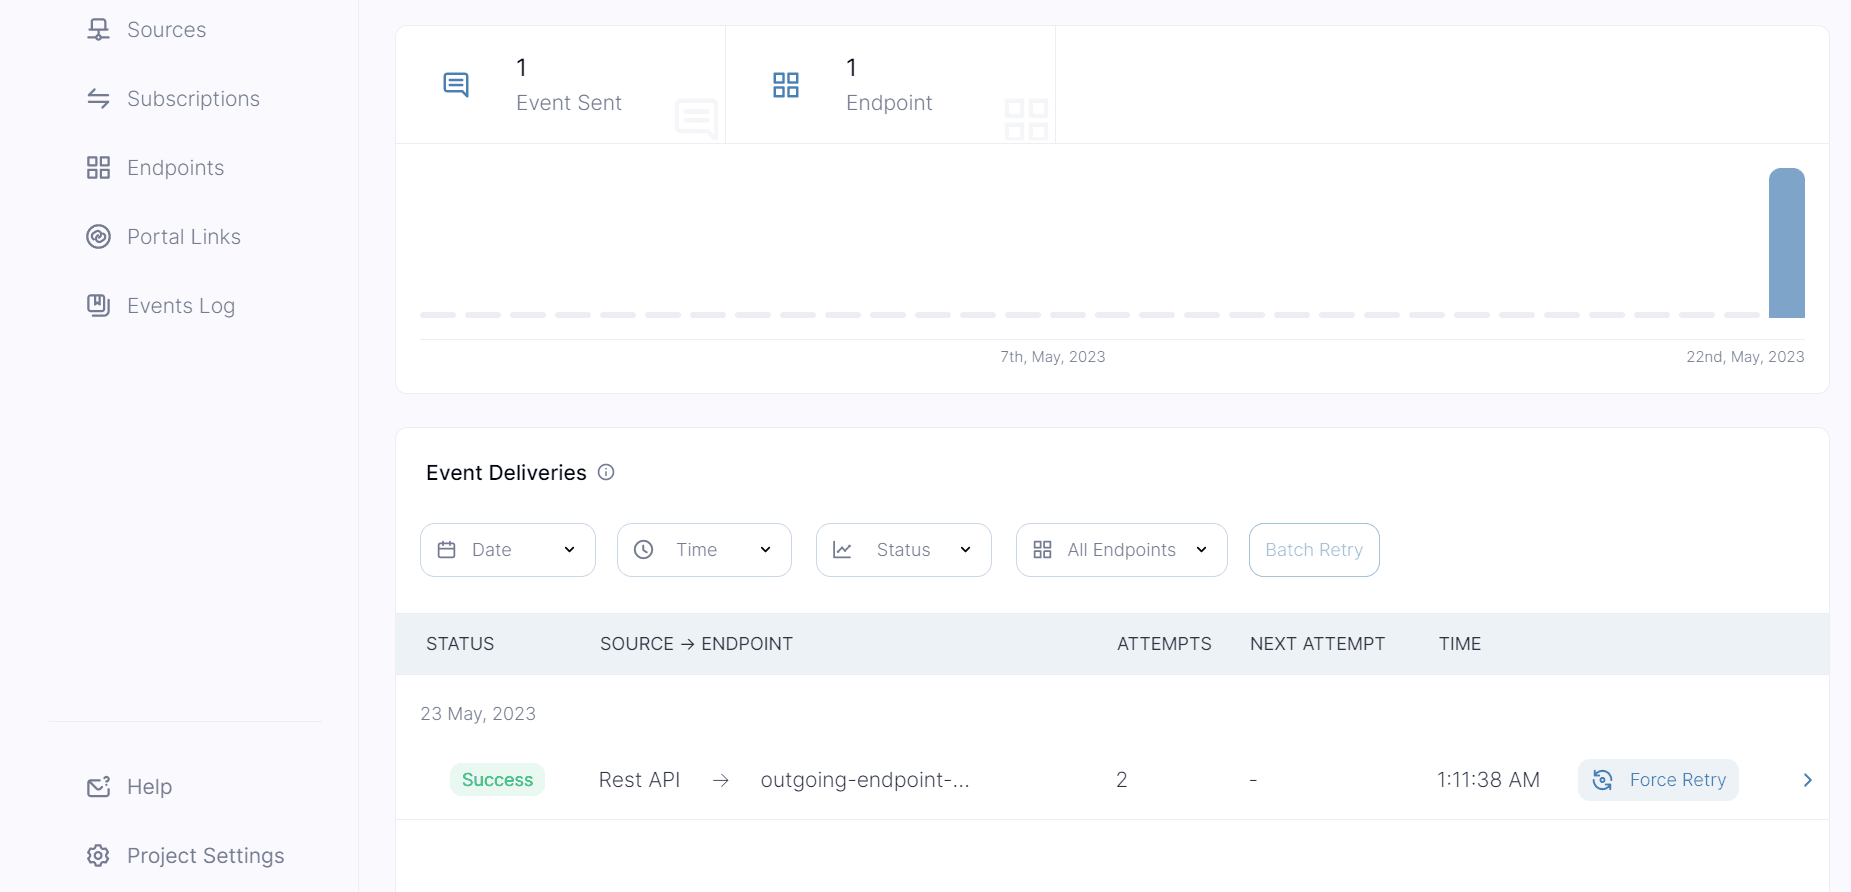
See that the event is now received on the endpoint and that a successful event delivery is now recorded.
Payload Structure
Payload structure here refers to the content of the body of a webhook request. In addition to setting Event Types, you can further define a webhook subscription by filtering requests based on their payload structure, this is known as subscription filtering in convoy. To implement this, you can edit an existing subscription or create a new one. Let's continue by creating a new subscription since we'd soon be needing at least two endpoints to demonstrate a different feature.
From the dashboard, go under Subscriptions and click on the "Create a subscription" button. On the next page do the following:
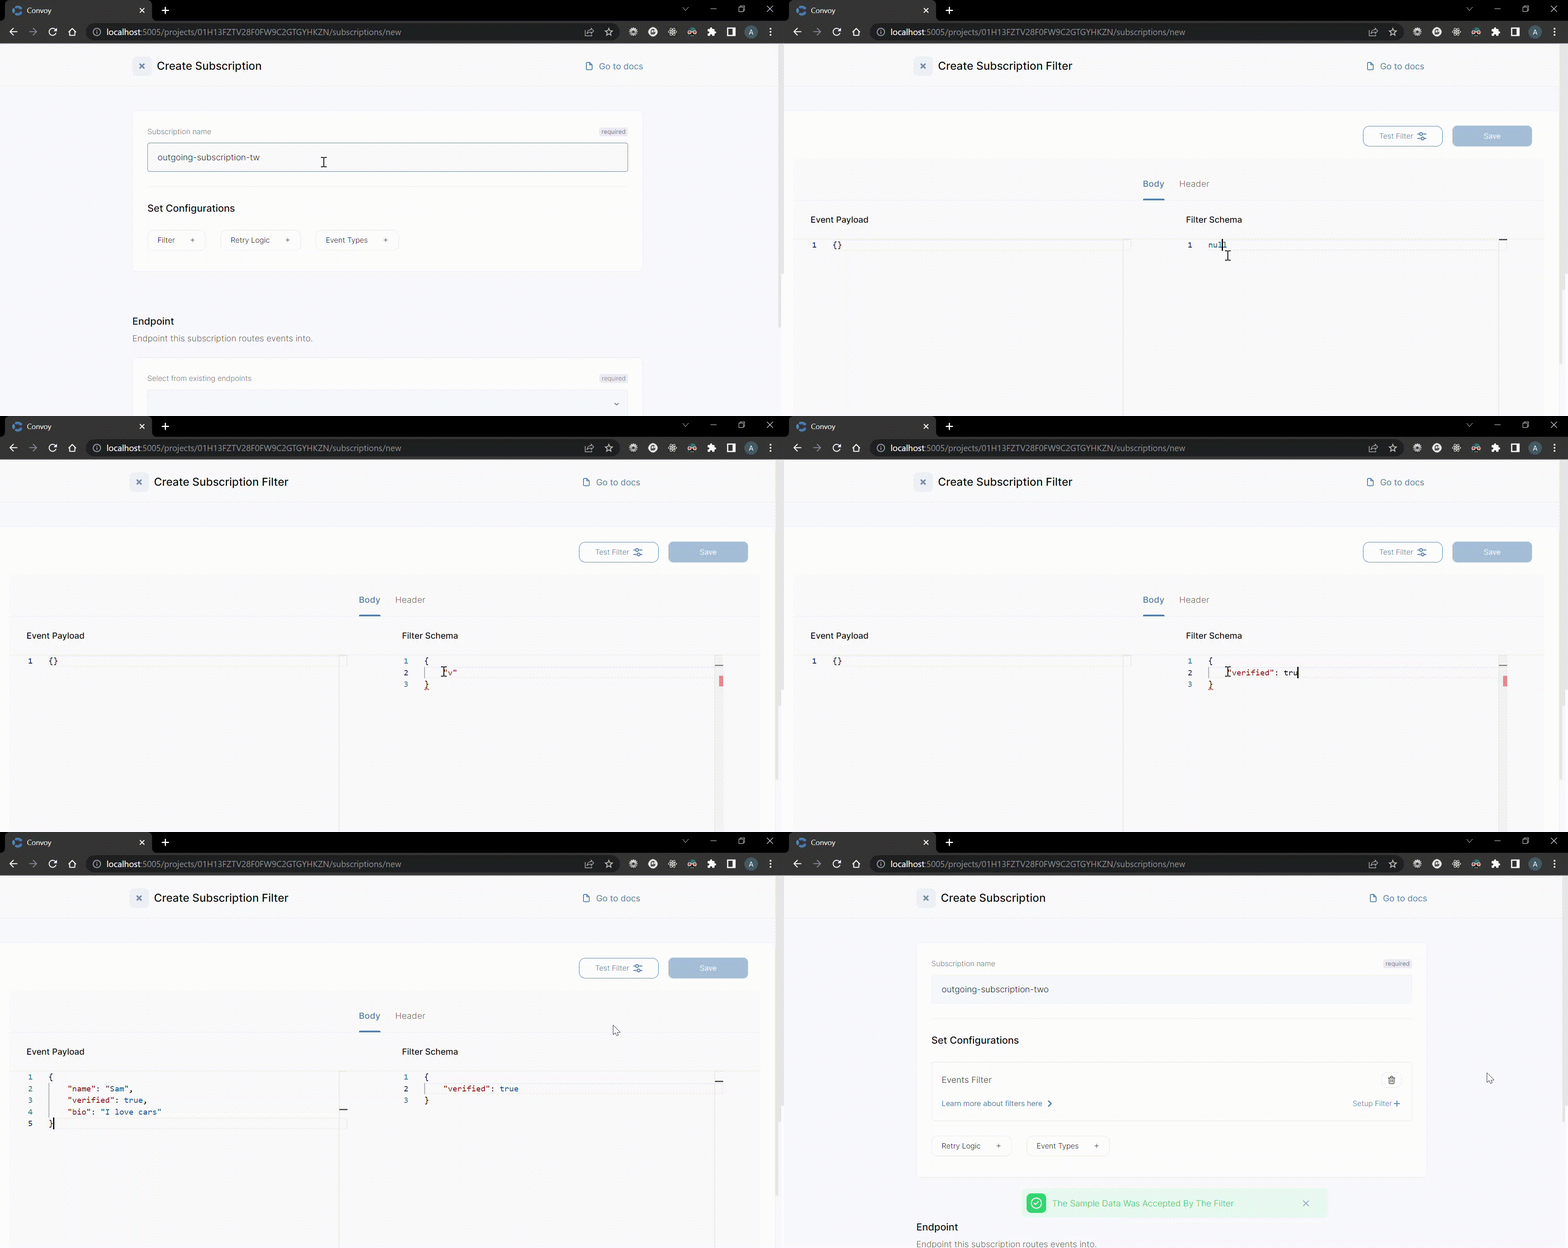
- Give the new subscription a name (i used "outgoing-subscription-two").
- On the Set Configurations section, select filter > Setup Filter, it should open the subscription filter interface. On the right side is the editor for defining a filter schema, while on the left side you're expected to provide a sample event payload that matches the schema. The payload schema to use for this example is:
{
	"verified": true
}
Sample event payload:
{
	"name": "Sam",
	"verified": true,
	"bio": "I love cars"
}
Test the filter to ensure that the sample data is accepted by the filter and Save.
Still under the Set Configurations section, select Event Types and create two event types
user.created&user.deletedjust as with the first subscription.Scroll down to attach an endpoint to this subscription. Click on Create New Endpoint, and give the new endpoint a name. I used "outgoing-endpoint-two".
Enter a new URL. You can obtain a second URL from webhook.site
Finally, hit the Create Subscription button.
Use the below POST request to publish an event targeted at the second endpoint, again replacing <host>, <your-project-id>, <project-api-key> and, <second-endpoint-id> with their actual values.
$ curl --request POST \
  --url <host>/api/v1/projects/<your-project-id>/events \
  --header 'Authorization: Bearer <project-api-key>' \
  --header 'Content-Type: application/json' \
  --data '{
    "endpoint_id": "<second-endpoint-id>",
    "event_type": "user.created",
    "data": {
      "name": "Ben",
      "verified": true,
      "bio": "Professional photographer"
    }
}'
The above should create a successful event delivery. You can change the value of verified in the payload to false and see that the targeted endpoint "outgoing-endpoint-two" does not receive the notification. Convoy supports many more forms of filtering, find the complete rundown of available filters in the documentation
Webhook Fan-out
Webhook Fan-out refers to a technique used to dispatch webhooks events to multiple endpoints at a go. This makes it possible for webhook consumers to provide multiple endpoints where they need the same events to be received. Starting from v0.8 Convoy introduced a new mechanism for webhook fan-out. To fan out events to multiple endpoints, the event needs to be published using the /events/fanout endpoint. There's also a new field on the endpoint object--owner_id, this field is used to identify endpoints as belonging to the same entity. To enable the two endpoints that we have created to receive events sent through the convoy API /events/fanout endpoint, we need to update the endpoints to assign them an owner id of the same value. Use the following request template to update each of the endpoints:
$ curl --request PUT \
    --url <host>/api/v1/projects/<your-project-id>/endpoints/<endpoint-id> \
    --header 'Authorization: Bearer <project-api-key>' \
    --header 'accept: application/json' \
    --header 'content-type: application/json' \
    --data '{
      "owner_id": "accounts"
    }'
Confirm that the endpoints have been updated with an owner id value of "accounts", if so, you're ready to fan out events to these endpoints. The following request will do exactly that:
$ curl --request POST \
  --url <host>/api/v1/projects/<your-project-id>/events/fanout \
  --header 'Authorization: Bearer <project-api-key>' \
  --header 'Content-Type: application/json' \
  --data '{
    "owner_id": "accounts",
    "event_type": "user.created",
    "data": {
      "name": "Sandra",
      "verified": true,
      "bio": "Professional Mekeup artist"
    }
}'
Check that both endpoints received the webhook request:
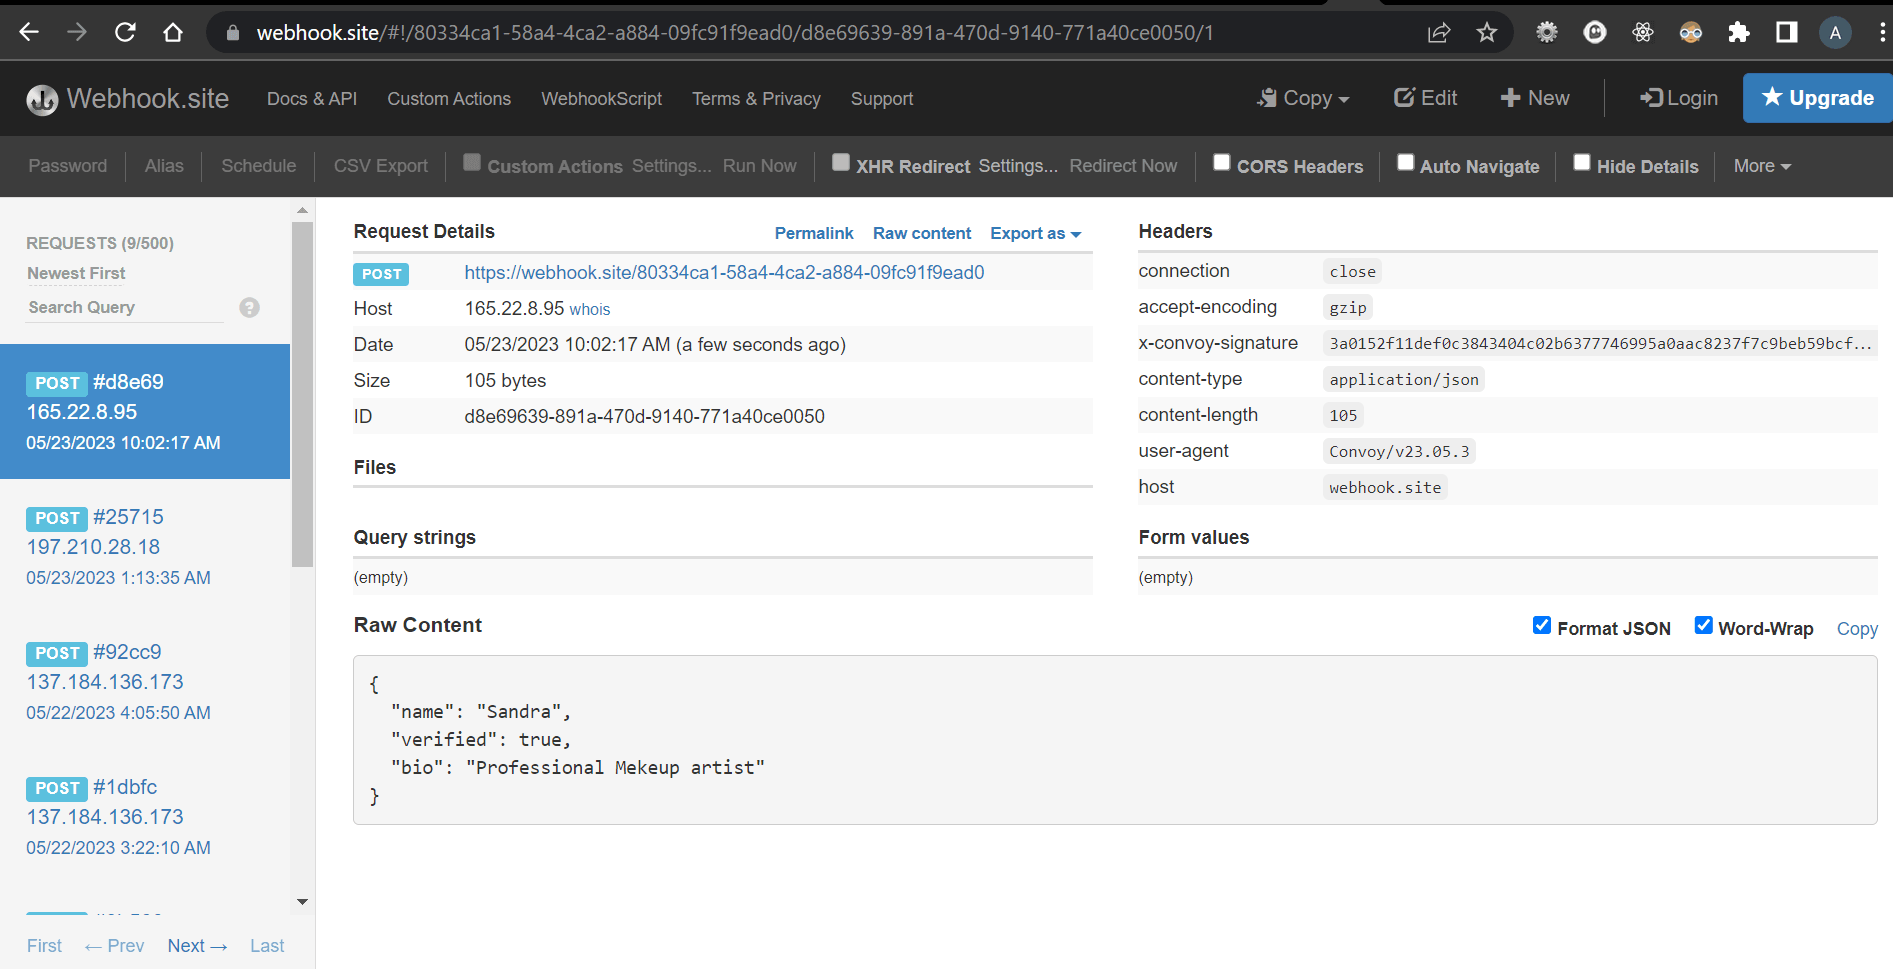
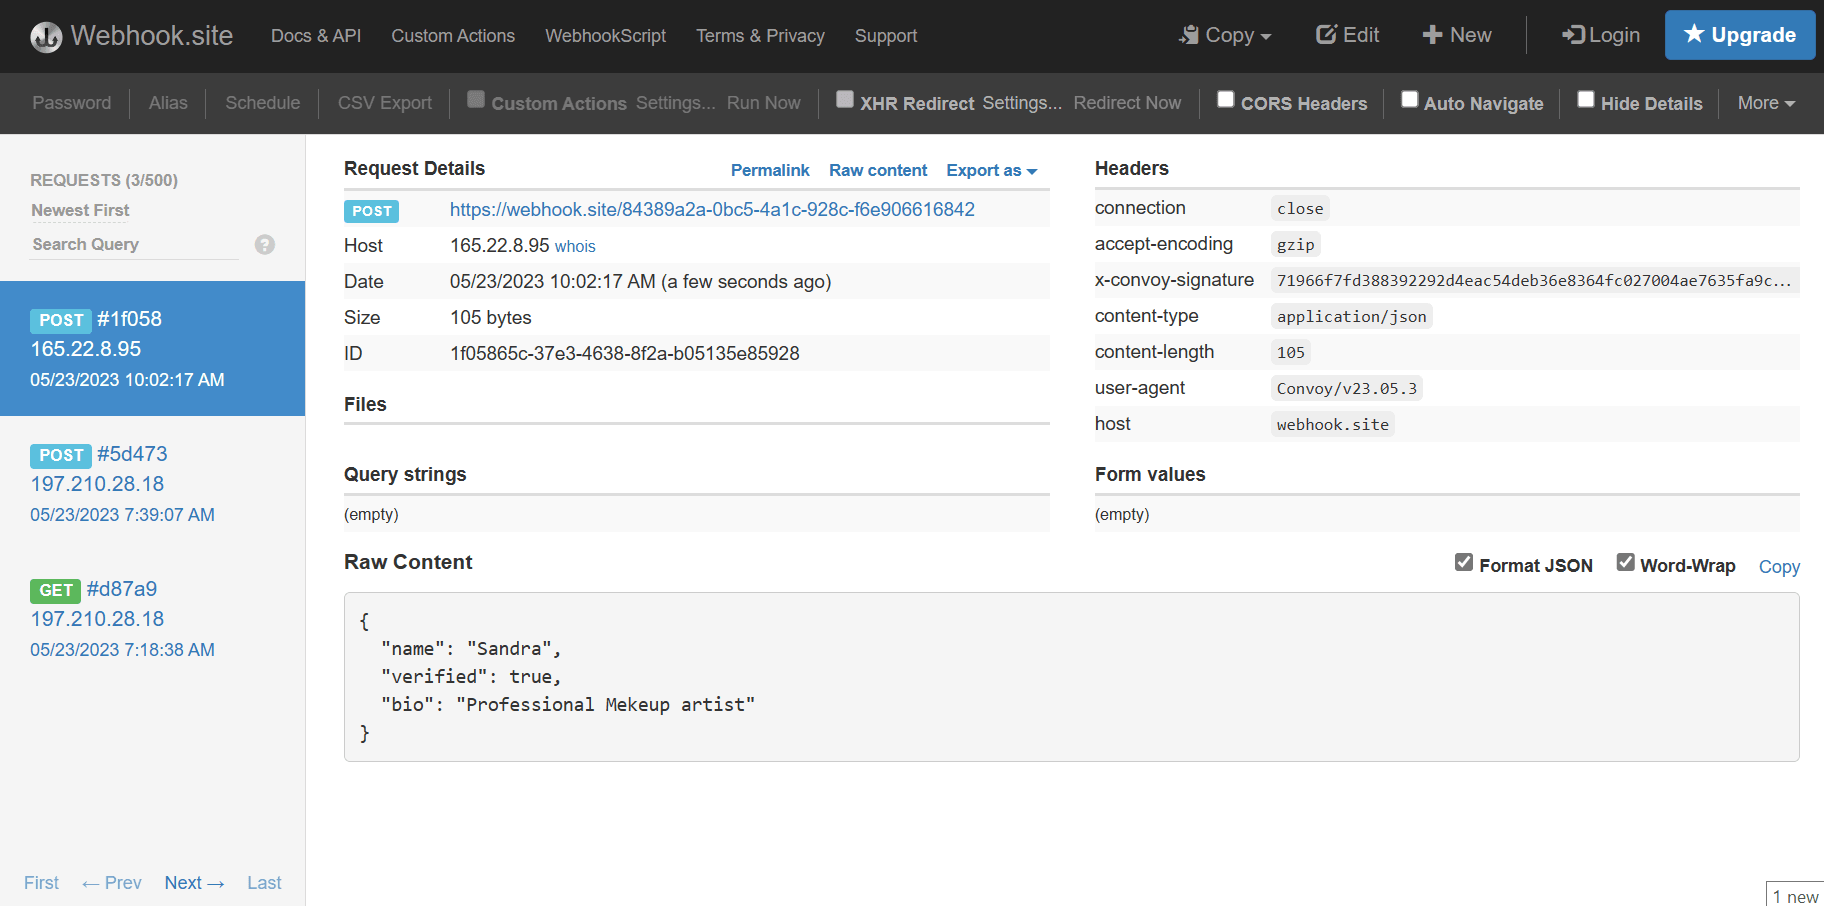
When you fan out webhook events, their Event types and payload structure are still compared against those set on each of the endpoints. If these checks are present, they have to match, otherwise, notifications will not be sent to the endpoints where they do not match.
Retry Logic
Another option available to you when creating a webhook subscription in Convoy is the facility to create a Retry Logic. Depending on your understanding of what kind of downtimes can occur on an endpoint, you can create a schedule for failed events to be retried a specific number of times and within the specified intervals. Convoy supports two retry mechanisms: the default is the Linear time retry where the time between each event retry is fixed, while the other is the Exponential back off retry, where the time between each retry progressively increases before the next retry attempt. You can find the option to create a retry logic under the Set Configurations section when creating a subscription.
Conclusion
This post shed light on what webhook subscriptions are, it explains that they are a way to enlist or subscribe to an endpoint to receive webhook requests when an event is triggered. You saw the features that are available to you when creating a webhook subscription in Convoy, and how to use them together to manage event routing in a convoy project. If what has been described here sounds like it would meet your needs, then you're welcome to try Convoy Cloud, and join us in our slack community.

